|
| Shellac Day 1 |
Ever since CND launched Shellac in May 2010, I've been wanting to get it. Part of my hesitation was in the fact that it was the same color for so long, part of it was the limitation in the actual colors, and the obvious of "I live in a small town where people are all about long squared french nails; Shellac what?". When I literally lucked into getting a Shellac manicure during Cosmoprof last month, I was pretty ecstatic to finally try this out from the people who made it. (Part of that was an experiment because now I know exactly how it's supposed to be applied!)
Before I get into my experience, let me tell you that six new colors are launching this month:
 |
| 1st Row: Zillionaire & Asphalt 2nd Row: Moonlight & Roses & Purple Purple 3rd Row: Studio White & Hotski to Tchotchke |
- Zillionaire - a dazzling multi-colored effect (great for layering over any color)
- Studio White - semi-sheer soft white (natural french manicure option)
- Moonlight & Roses - opalescent pink
- Purple Purple - iridescent azure violet
- Asphalt - concrete grey
- Hotski to Tchotchke - vibrant teal
This brings the total of Shellac colors to 30. Now on top of there being these 30 colors, you're able to layer colors with each other, so that's exactly what I decided to do.
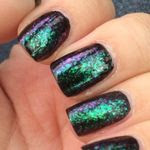
After looking at some color wheels that were at the CND booth, I chose a pre-designed "rock-n-roll darks" of Rock Royalty with Iced Coral. This results in a purple base with a blue to green shift shimmer. Then I had a layer of the new Zillionaire added for some glitz. We playfully named it "Bridezillionaire".
So Shellac is literally marked down to a science. First, Kristina Saindon from Denver, Colorado (a CND Educator Ambassador who also owns a salon called Kristina's located at 6660 W. 38th, Wheat Ridge, CO 80033 in case you're in the area) prepped my nails with CND ScrubFresh and cleaned up my cuticles. I had an artificial nail on my index finger of my right hand, so I figured Shellac wouldn't be able to be applied but surprise #1 (of many), you can put Shellac over false nails! She did have to rough the surface ever so slightly of the artificial nail but my natural nails needed no other prep work.
Next, Kristina applied a base coat of the CND Shellac UV Base Coat, making sure to wrap the tips. Then it goes into the CND UV Lamp for 10 seconds. Oh yes, just 10 seconds. Next we added one coat of Rock Royalty (again, wrapping the tips) and my hand went in for 2 minutes. Thin coats are used after shaking the bottle vigorously. This seems to go against what I've always heard about polish, but thin is better with Shellac. As for the lamp itself, there are little grooves in the lamp so you know to stop moving your hands in. The lamp has bulbs on all sides so the sides of the nail are cured as well as the top. My third coat was Iced Coral - 2 more minutes. Coat #4 was Zillionaire which gave it such a pop of sparkle. The last coat (#5!) was the CND Shellac UV Top Coat for 2 minutes. If you're keeping track, that's less than 17 minutes for the entire polishing process. After the top coat was cured, a tacky layer is left behind which Kristina wiped off with a cotton pad soaked in 99% Isopropyl Alcohol and I was done. The manicure was extremely shiny and completely dry to the touch. She gave me a little bag that included a mini SolarOil, the CND Shellac Remover Wraps, an orange stick, and some literature on Shellac.
Remember how one of my problems with Shellac was that you're stuck with the same color the ENTIRE time you have the manicure? Surprise #2: No you're not. You can use ANY polish over Shellac and when you want to remove said polish, just use non-acetone remover. I tested this (a lot) using A Beautiful Life natural soy remover without any harm to my Shellac - not even dulling the shine of the manicure. Can we say winning? WINNING.
Time for some pictures.
 |
| Day 2 |
 |
| Day 6 |
 |
| Day 6 |
 |
| Day 6 |
 |
| Day 9 |
 |
| Day 12 |
 |
| Day 12 |
 |
| Day 12 |
 |
| Day 12 |
After 12 days, you can see there really wasn't much new growth and the shine is still spot on, & tip wear is non-existent. Amazing.
Finally on Day 20, I decided it was time to remove it. I started being annoying and picking it at the new growth edge and was able to literally peel it off my finger (NOT RECOMMENDED). You can see there is zero damage to my nail (thankfully!).
 |
| Day 20 |
Now, CND does not recommend you remove the Shellac yourself, but instead go back to a salon. This is what they should do though:

The CND Shellac Remover Wraps feature an integrated cotton pad that limits fingers and skin exposure to acetone and built-in adhesive tabs secure. The edge of your finger should be at the top of the cotton pad, which needs to be soaked with pure acetone. I used an eye dropper to make sure it only got on the pad.

A good argument for going back to a salon is because you will next fold the pad over the finger and secure it with the adhesive tab. The CND logo should be where your nail is (if you've done it right - not too tight, not too loose). Wait 10 minutes (no more, no less).

After the 10 minutes, I slid off my wrap to reveal this:

Okay so my tip was clear, the Iced Coral and Zillionaire was pretty much gone - what about the rest? What I didn't know about Shellac is that tiny (not visible to the naked eye) tunnels are created in the Shellac system that allow acetone to flow down all the way to the base coat of your polish. The 10 minutes exposure allowed the acetone to break up the polish so I used needed my orange stick to flake off the rest of the polish.

Like seriously flake it off!
This was my hand after using the CND Shellac Removal Wraps:

Now, you can see a bit of residue is still left - I feel this is because I tried to apply the wraps myself and didn't get them completely placed in the right place (which is also why you can see the whites on my cuticles of the acetone). At this point, I took my Zoya Remove+ on a cotton pad, and just started working to remove the rest. After some of that, some SolarOil and a bit of Lush Lemony Flutter...

Tada!
I'm totally sold. I would definitely get Shellac for a long vacation, or just to let my nails grow out - get it in Studio White so my nails could grow underneath and I could still wear other colors on top of the Shellac. (Now granted, layering white under polish will make any color appear brighter - not good for blogging purposes, but great for actually wearing colors - even sheers!)
CND Shellac did make my nails appear a bit thicker than normal but it also made them stronger. Not even three days after removing my Shellac did I break THREE nails (which is why I'm back to super nubbins).
Thank you so much to Kristina, CND, and RED PR for allowing me to try out Shellac at Cosmoprof. Definitely a very positive experience for me and one that I can't wait to try again in the future. I'd LOVE to get a pedicure like BeautyJudy did since I have no desire to change my toenail polish like I do my fingernail polish.
Disclosure: The product[s] in this post was [were] provided to me by the company during the Cosmoprof North America - Las Vegas 2011 Convention for no charge. For more information, please read this post.